This job is typically handled by experienced fleet mechanics or professional diesel technicians. Some owner-operators with a solid mechanical background tackle it themselves—but that requires the right tools, a second set of hands, and a clear understanding of what can go wrong.
This guide covers the full replacement process: diagnosis prerequisites, step-by-step removal and installation, post-replacement validation, and the most common problems technicians encounter along the way.
Key Takeaways
- Heavy-duty truck radiator replacement typically takes 4–8 hours depending on truck model and technician experience
- Always verify part compatibility by make, model, year, and engine spec before ordering—variants across the same model year can differ in core size, inlet/outlet position, and mounting
- Draining coolant, disconnecting hoses, and removing the fan shroud must happen before the radiator can come out
- Post-replacement pressure testing is required before the truck returns to service
- Quality aftermarket radiators from a specialized supplier deliver OEM-equivalent performance at a lower cost
Overview and Prerequisites
Scope and Time Expectations
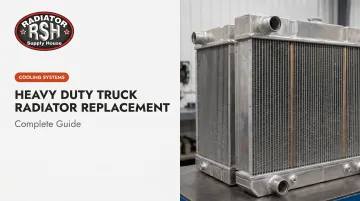
A heavy-duty truck radiator replacement is more involved than its passenger-vehicle equivalent. The radiator is larger, often weighing between 40 and 139 lbs depending on the platform (a genuine PACCAR unit for the Kenworth T680 weighs 139 lbs). It's also integrated with multiple systems: the fan shroud, charge air cooler, overflow tank, and in many configurations, transmission or oil cooler circuits built directly into the end tanks.
A trained fleet mechanic working on a straightforward configuration can complete the job in 4–6 hours. First-timers or trucks with complex cooling setups—PTO coolers, dual cooling circuits, integrated transmission coolers—should plan for 8 hours or more.
Safety and Pre-Work Requirements
Before touching anything:
- Engine must be fully cooled — minimum 2–3 hours after last operation; never open a pressurized cooling system
- Truck secured on a flat, stable surface — chocked wheels, parking brake engaged
- Coolant disposal planned — the EPA confirms used antifreeze may contain dissolved heavy metals that can contaminate soils and groundwater; disposal requirements vary by state, so check local regulations before draining
Compatibility Checks
Part number cross-referencing is critical. Configurations vary significantly across the major Class 8 platforms: Freightliner Cascadia, Kenworth T680, Volvo VNL, and Peterbilt 579 each have multiple radiator variants depending on spec year and integrated cooler options.
Key variables to confirm before ordering:
- Oil cooler integration — many models are available with or without built-in oil coolers (designated with "-OC" variants); this affects both dimensions and thermal capacity
- End tank material — plastic, aluminum, or steel tanks each have different compatibility implications
- Core thickness — feedlot or heavy-duty versions often run thicker cores (typically 2¼ inches vs. standard)
- Transmission cooler integration — some configurations require internal ATF cooler functionality

Radiator Supply House stocks complete assemblies for all major Class 8 brands, with inventory spanning 300+ manufacturers including Freightliner, Kenworth, Peterbilt, Volvo, and International. ICEBOX OEM-equivalent parts are cross-referenced to multiple OEM part numbers, which simplifies fitment confirmation across variant configurations. For spec-specific questions, reach their team at +1 877-615-3002 before ordering.
Tools and Parts Required
Tools checklist:
- Large-capacity drain pan
- Coolant hand pump or drain valve tool
- Combination wrenches and ratchet set
- Torque wrench
- Flat-tip and Phillips screwdrivers
- Hose clamp pliers and needle-nose pliers
- Cooling system flush kit
- Floor crane or second technician (required for safe radiator handling)
Parts and consumables:
- Replacement radiator (verified fitment)
- OEM-spec coolant in the correct type and concentration for the engine
- New upper and lower radiator hoses if worn or brittle
- New hose clamps
- Replacement radiator cap if the pressure rating is compromised
- Thread sealant for drain plugs
Material note: Both copper-brass and all-aluminum radiator constructions are available for Class 8 trucks. All-aluminum is the modern standard, offering lighter weight with strong thermal performance. Copper-brass core options remain available for older models and certain specialized applications.
Do not mix coolant types. Detroit Diesel, for example, prohibits NOAT coolants, phosphate inhibitors, and passenger-car coolants in systems running ELC/OAT formulations. PACCAR and Volvo have similarly specific requirements. Always verify coolant spec against the truck's OEM manual before filling.
How to Replace a Heavy Duty Truck Radiator: Step-by-Step
Radiator replacement follows a defined sequence. Rushing drainage or skipping steps during reconnection creates repeat failures within days of the truck returning to service.
How to Remove the Old Radiator
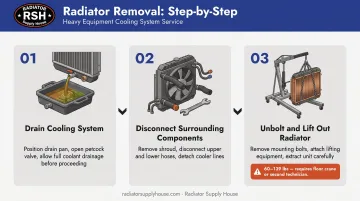
Step 1 – Drain the cooling system
Open the radiator drain valve or remove the lower hose to drain all coolant into the drain pan. Use a hand pump to pull residual coolant from the overflow tank. Dispose of used coolant according to your state or local requirements—do not pour it down a drain.
Step 2 – Disconnect and remove surrounding components
Remove components in this sequence:
- Remove upper and lower radiator hoses
- Disconnect transmission cooler lines—cap them immediately to prevent ATF loss
- Unplug fan shroud electrical connectors
- Remove fan shroud mounting bolts and set the shroud aside
On most Class 8 trucks, the fan shroud must come out before the radiator can be lifted. Don't skip this step or try to work around it.
Step 3 – Unbolt and remove the radiator
Unbolt the radiator mounting brackets—typically top mounts and lower cradle supports. Carefully tilt the radiator forward to clear the fan, then lift it out using a floor crane or with a second technician. Never attempt to lift a heavy-duty radiator solo. These units routinely weigh 60–139 lbs depending on the platform.
How to Install the New Radiator
Step 4 – Position and seat the new radiator
Lower the replacement radiator carefully into the mounting cradle. Before securing anything, check that the lower rubber isolator pads are fully seated. Verify the radiator sits flush and plumb — a canted radiator creates clearance issues with the fan and puts uneven stress on mounting points. Only then torque the top mounts.
Step 5 – Reconnect all components in reverse order
Work back through the sequence:
- Reinstall and torque the fan shroud mounting bolts to spec
- Reconnect transmission cooler lines—check immediately for drips
- Attach and clamp upper and lower radiator hoses
- Reconnect the overflow tank hose
- Install the radiator cap
Every hose must be fully seated over the inlet/outlet nipple before the clamp is tightened. A clamp over a partially seated hose will leak at operating temperature.
Step 6 – Fill with fresh coolant
Use the correct coolant type and ratio as specified in the truck's OEM manual. Fill slowly to minimize air pockets. Run the heater on max temperature during fill, which opens the heater core circuit and helps purge trapped air.
Leave the radiator cap slightly loose initially to allow air to escape as the system fills.
Post-Replacement Checks and Validation
Skipping post-installation validation is one of the most common and costly mistakes in radiator replacement. A truck that looks fine during a yard test can develop a leak or overheat under load miles into a run.
Visual and Structural Checks
Before starting the engine, do a full walk-around of the engine bay:
- All hose clamps are tightened and correctly positioned
- Coolant lines run without kinks
- Transmission cooler line fittings are snug
- No tools, rags, or debris remain in the engine bay
- Fan shroud has correct clearance from fan blades
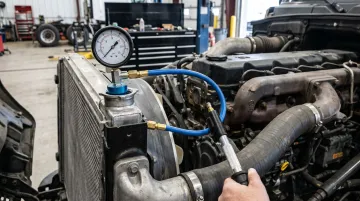
Functional Testing and Pressure Validation
Start the engine and let it reach full operating temperature. Monitor the temperature gauge continuously. Watch for:
- Steam or coolant odor from the engine bay
- Gauge creep above normal operating range
- Drips or seepage at hose connections, the drain plug, or radiator end tanks
Once the engine reaches operating temperature and cycles back down, perform a pressure test using a cooling system pressure tester. Pressurize the system to the radiator cap's rated pressure and hold for at least two minutes. Any pressure drop means there's a leak that must be found and corrected before the truck goes back to work.
With the pressure test confirmed, top off coolant to the correct level after the system has fully cycled. Check the overflow tank level again after the first real-world run. Large heavy-duty cooling systems can take one or two full heat cycles to fully purge air before the level stabilizes.
Common Problems and How to Fix Them
Most problems surface either during installation or within the first 24–48 hours back in service.
Coolant Leak at Hose Connections After Installation
Coolant dripping or seeping from upper or lower hose connections after startup usually points to one of two installation oversights: the clamp wasn't torqued to spec, or the hose wasn't fully seated over the radiator nipple.
With the engine fully cooled, reseat the hose completely over the nipple, replace the clamp if it's deformed, re-torque to spec, and retest at operating temperature.
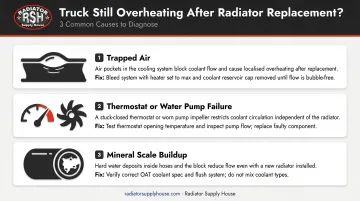
Overheating Despite New Radiator
If the temperature gauge still climbs after the new radiator is installed and filled, the radiator itself is rarely the problem. Two causes account for most of these callbacks:
- Trapped air: An air pocket blocking full coolant circulation is the most common culprit. Run the engine with the heater on max and the radiator cap slightly loosened to bleed the system.
- Pre-existing thermostat failure: If the thermostat was already faulty, replacing the radiator alone won't solve the problem. Test the thermostat and water pump before condemning the new core.
- Mineral scale buildup: Using non-OAT coolants can leave mineral salt deposits on radiator tubes that restrict heat transfer. PACCAR/Peterbilt TRP documents this as a real overheating risk.
Transmission Cooler Line Drip
A small but persistent ATF drip at the transmission cooler line fittings almost always comes down to thread engagement or the O-ring seal. If the O-ring wasn't replaced during reinstallation, it's usually the first thing to check.
To fix it:
- Drain and disconnect the line at the end tank fitting
- Inspect and replace the O-ring or crush washer
- Apply thread sealant if appropriate for the fitting type
- Reconnect and re-torque to spec, then recheck after the first heat cycle
Pro Tips for a Successful Replacement
A few habits separate a clean, one-and-done replacement from a job that comes back to bite you. These practical steps take minimal extra time but pay off at every future service interval.
- Photograph the engine bay before pulling anything apart. Hose routing, bracket positions, and wire loom placements on a large diesel are hard to reconstruct from memory — two minutes of photos can save an hour of head-scratching during reassembly.
- Check the fan clutch, water pump, thermostat housing, and hose condition while the radiator is out. Everything is accessible right now. Replacing a worn thermostat today costs a fraction of revisiting the same job six months from now.
- Record the coolant type and concentration used, and set a reminder to check hose connections and coolant level at the first service interval post-installation. A slow seep caught early never becomes a repeat replacement.
Conclusion
A correctly replaced heavy-duty truck radiator restores full cooling capacity and protects the engine from the kind of heat damage that ends service life early. The job rewards disciplined execution at every stage—correct part selection, proper drainage, careful reassembly, and thorough post-installation validation.
When you're ready to source a replacement, getting the right core construction (copper-brass or all-aluminum) and the correct fitment for your specific truck model matters as much as the installation itself. Radiator Supply House stocks aftermarket radiators and cooling system components for commercial trucks and heavy equipment across major manufacturers — so you can get the right part without the runaround.
Frequently Asked Questions
How much does it cost to replace a radiator in a truck?
Cost varies by truck model, configuration, and part source. Quality aftermarket radiators typically run 30–50% less than OEM units. Labor rates differ between dealerships and independent shops, and unplanned downtime adds to the true cost of any deferred repair.
What is the life expectancy of a truck radiator?
Lifespan varies based on coolant change intervals, operating conditions, and how quickly early corrosion or leaks are addressed. Consistent coolant maintenance is the single biggest factor in extending radiator life.
Is it worth replacing 20-year-old radiators?
Yes, if the truck has meaningful remaining service life. A failing radiator puts a far more expensive engine at risk. Quality aftermarket options—including ICEBOX replacement parts from Radiator Supply House, which covers legacy models going back to the 1980s—make replacement cost-effective even on older trucks.
How long does it take to replace a heavy duty truck radiator?
An experienced fleet mechanic typically completes a straight replacement in 4–6 hours. Complex configurations or first-time technicians should plan for 8 hours or more.
Can I replace a heavy duty truck radiator myself?
DIY replacement is possible with solid mechanical experience, the right tools, and a second person to safely handle the radiator's weight. Professional installation is recommended for trucks under warranty or with complex cooling configurations involving multiple integrated coolers.
What is the difference between OEM and aftermarket heavy duty truck radiators?
OEM radiators come from the truck manufacturer and carry a higher price. Quality aftermarket radiators—such as ICEBOX units from Radiator Supply House—are engineered to match OEM fitment, dimensional specs, and thermal performance at a lower cost. When sourced from a reputable supplier and installed correctly, a quality aftermarket unit performs on par with OEM over its service life.