The challenge is that aluminum cores fail differently than copper-brass units. The wrong repair approach — stop-leak additives, patch welding, or ignoring multiple pinhole leaks — can create a false sense of security while the underlying metal continues to weaken. A failed repair in the field costs far more than a correct decision made upfront.
This guide covers how to identify core damage, what can realistically be repaired, the full step-by-step repair process, and when re-coring or full replacement is the only call that makes sense.
Key Takeaways
- Aluminum cores fatigue from heat cycling — patch repairs treat symptoms while the underlying metal weakness remains
- Multiple pinhole leaks or corrosion failures mean the entire core is compromised, not just one spot
- Pressure-test the system before and after any repair — skipping this step masks incomplete fixes
- Re-coring is the correct middle-ground option when tanks are intact but the core is shot
- Stop-leak additives can clog oil coolers, charge air coolers, and other cooling circuit components; they are not a permanent fix
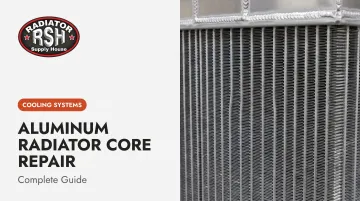
What Is an Aluminum Radiator Core?
The radiator core is the internal tube-and-fin assembly that does the actual heat transfer work: hot coolant flows through the tubes, ambient air passes over the fins, and heat dissipates. The core is distinct from the end tanks (reservoirs) and the overall radiator assembly — it's the part that actually wears out.
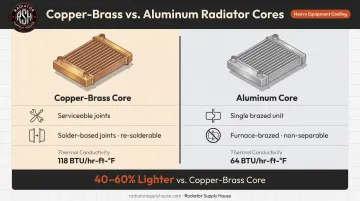
Aluminum has become the dominant core material in modern heavy equipment, commercial trucks, and agricultural machinery for two reasons. According to Northern Radiator's material comparison, aluminum outperforms copper-brass on the metrics that matter most to heavy equipment operators:
- Weight: Plastic-tank/aluminum-core heavy-duty truck radiators weigh 40–60% less than copper-brass equivalents
- Thermal conductivity: Aluminum transfers heat at 118 BTU/(hr-ft-F) versus 64 BTU/(hr-ft-F) for brass used in radiator construction
The tradeoff is fatigue. A 2020 engineering study on truck radiator fatigue life found that radiators experience pressure cycling, thermal cycling, and road vibration across their service lives — with maximum stress concentrating at header-tube joints. Aluminum expands and contracts with every heat cycle, and that repeated movement progressively weakens the metal.
Copper-brass construction uses solder-based joints that can be disassembled and re-soldered. Aluminum cores are furnace-brazed as a single assembly — there's no equivalent disassembly option. That structural difference shapes every repair decision discussed in this guide — from what can be patched in the field to when a full core replacement is the only viable path.
Common Problems With Aluminum Radiator Cores
Most aluminum core failures follow a predictable pattern. Catching them early — before one failure triggers a full cooling system breakdown — means knowing what each failure point looks like in the field.
External Tube Leaks
Symptoms: Coolant weeping or dripping from tube rows, puddles under equipment after shutdown, coolant level dropping without hose or cap issues.
Likely cause: Physical impact from rocks or debris, vibration, or localized corrosion from degraded coolant attacking the tube wall. Fleet Maintenance notes that aluminum is the cooling-system metal most prone to corrosion and that corrosion weakens components until failure.
Fin Damage and Airflow Blockage
Symptoms: Rising coolant temperature under normal load, visible crushed or missing fin sections across the core face, restricted airflow.
Likely cause: Debris impact, or pressure washing too close to the core. John Deere's operator documentation is direct on this: "Do not use pressure washers to clean radiator cooling fins. The force produced by pressure washers will damage the radiator and cooling fins." Low-pressure compressed air or a careful rinse from back to front is the correct method.
Internal Corrosion and Deposit Buildup
Symptoms: Coolant that appears rusty, brown, or sludgy; reduced cooling efficiency even after flushing; pinhole leaks appearing at multiple locations.
Likely cause: Coolant left in service beyond its recommended interval loses its corrosion inhibitors, leaving aluminum tube walls vulnerable to electrochemical attack. When pinhole leaks appear at multiple locations simultaneously, that points to systemic internal corrosion — not a one-off failure that patching can solve.
Tank-to-Core Separation
Symptoms: Coolant leaking at the seam where the end tank meets the header plate, typically as a pressurized leak rather than a slow weep.
Likely cause: Metal fatigue at the brazed or crimped joint from repeated thermal cycling, improper mounting that transmits chassis flex stress into the core, or direct impact.
Why Aluminum Radiator Cores Fail
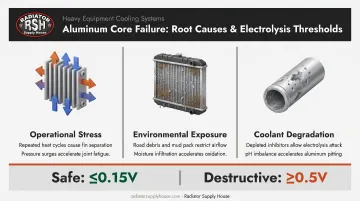
Aluminum core failures stem from three overlapping causes:
- Operational stress — continuous heat cycling causes expansion and contraction, progressively weakening the metal at stress concentration points (particularly tube corners and header joints)
- Environmental exposure — road debris, moisture, and chemical contamination accelerate surface degradation
- Coolant-related degradation — wrong coolant type, extended change intervals, or electrolysis from improper electrical grounding attack the metal from the inside
Electrolysis deserves specific attention because it's frequently overlooked. Stray electrical current can use coolant as a conductor when chassis grounding is inadequate. The acceptable voltage threshold is no more than 0.15V for aluminum components — at 0.5V, the damage becomes destructive over time. Routine multimeter checks at each service interval can catch this before it destroys the core.
The other factor that accelerates failure: ignoring early symptoms. Reduced cooling capacity forces the engine to operate above its design temperature. In heavy equipment running demanding cycles, that means accelerated wear across multiple engine components — and unplanned downtime that costs far more than any repair.
One distinction matters here: a repaired aluminum core is still a fatigued aluminum core. The repair may fix the visible symptom, but the underlying metal weakness remains throughout the assembly. Before committing to repair, assess tube wall integrity, fin density, and header condition — not just the visible damage. A core that's compromised in multiple areas is a replacement candidate, not a repair candidate.
How to Repair an Aluminum Radiator Core (Step-by-Step)
Attempting a fix without confirming damage type and extent first is the most costly mistake in radiator repair. It leads to repeat failures, wasted labor, and — in some cases — engine damage from coolant loss when the repair fails under operating pressure. These five steps keep you from going down that path.
Step 1: Identify the Exact Problem
Drain the cooling system completely and remove the radiator for a full bench inspection.
- Inspect for visible damage: wetness, mineral staining (dried coolant leaves deposits that mark leak points), crushed fins, or tank-to-core seam separation
- Use a flashlight to inspect tube rows thoroughly — small cracks or pinholes are easy to miss
- Pressure test the core: plug the outlets and pressurize to the manufacturer-specified rating (typically 15–25 psi for most heavy equipment, consistent with system cap ratings)
- Document every failure point — one isolated leak tells a different story than three spread across the core
Step 2: Confirm the Root Cause
Before committing to any repair path, determine whether the damage is mechanical (impact, debris, improper mounting) or corrosion-related (degraded coolant, electrolysis).
That distinction determines your repair path. Mechanical damage to an otherwise sound core may justify professional repair. Corrosion-related failures indicate systemic weakness throughout the assembly — fixing one spot leaves the rest of the core in the same compromised state.
Also rule out external factors: verify the coolant mix is correct, the radiator cap holds proper pressure, and there's no stray electrical current in the system. These must be corrected regardless of repair path or the failure will recur.
Step 3: Apply the Correct Fix Based on Damage Type
Isolated mechanical damage (single punctured tube, localized fin crush on an otherwise sound core):
A qualified radiator shop can plug or rod out the damaged tube, straighten accessible fins with a fin comb, and pressure retest. This is the scenario where professional repair makes sense and can extend service life.
Corrosion-related or multiple tube failures:
Do not patch. The entire core is compromised. Repairing one location while leaving fatigued metal throughout the assembly guarantees a repeat failure — typically soon after, once the unit returns to operating pressure.
What NOT to do:
- Patch-weld aluminum — the surrounding metal is already fatigued and will fail next to the repair
- Use stop-leak additives as anything other than an emergency measure — in heavy equipment with integrated cooling circuits (oil coolers, charge air coolers, aftercoolers), stop-leak particles clog narrow passages and create new failures. Cummins O&M documentation is explicit: "Never use a sealing additive to stop leaks in the cooling system"
- Cut or crimp damaged tubes — this reduces cooling capacity and shifts additional pressure onto the remaining tubes
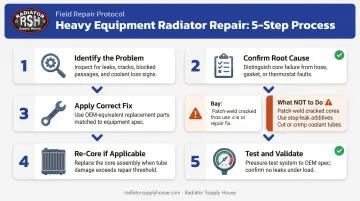
Step 4: Re-Core the Radiator (When Applicable)
When the tanks are structurally intact and only the core is compromised, re-coring is the cost-effective middle option. The old tube-and-fin assembly is removed and a new aluminum core is installed using the existing tanks — delivering new-core performance without full assembly replacement cost.
Ensure re-coring is done by a qualified shop using the correct core specification. Tube size, fin density, and row depth must match the original for proper airflow and cooling capacity. Substituting a lower-spec core to cut costs creates a cooling capacity deficit that surfaces under load.
Radiator Supply House stocks modular replacement cores for Caterpillar, Komatsu, John Deere, and other major brands. For Caterpillar equipment alone, inventory covers dozens of core SKUs across D-series dozers, wheel loaders, and articulated trucks. For hard-to-source models, build-to-spec manufacturing is available when a standard part isn't in stock.
Step 5: Test and Validate Before Reinstallation
Pressure test the repaired or re-cored unit to at least the system's rated operating pressure. Hold for a minimum of two minutes with no pressure drop before declaring the core serviceable.
After reinstallation:
- Refill with the correct coolant mixture (distilled water only — never tap water)
- Run the equipment through a full warm-up cycle to operating temperature
- Monitor the coolant temperature gauge throughout
- Inspect all connection points for leaks
- Check coolant level after cooldown — a drop indicates a leak that wasn't caught at bench pressure
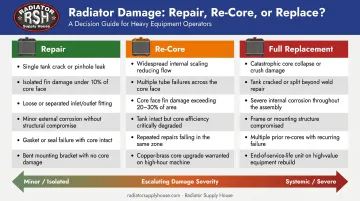
When to Repair vs. Re-Core vs. Replace
Every repair decision involves balancing the cost of the fix against remaining service life, equipment criticality, and the risk of a repeat failure in the field. An unplanned breakdown mid-operation typically runs far more expensive than the cost of the right repair decision made in the shop.
| Scenario | Recommended Action |
|---|---|
| Single isolated tube leak, core otherwise sound, no corrosion | Repair — professional tube plug/rod-out and pressure retest |
| Same radiator with prior repairs, or any corrosion signs | Replace core — prior repairs plus corrosion signal broader fatigue |
| Multiple tube leaks or pinholes at different locations | Re-core — core is systematically compromised, tanks still sound |
| Tanks also damaged, cracked, or contaminated with debris | Full replacement — compromised tanks create a new failure point |
| Tank-to-core separation or significant tank damage | Full replacement — aluminum tank damage is generally non-repairable |
| High-hour equipment, core at or beyond service life | Full replacement — repair economics favor a new unit over temporary patch |
When the decision lands on re-core or full replacement, sourcing the right unit quickly matters. Radiator Supply House stocks over 10,000 units across 300+ manufacturers — including Caterpillar, Komatsu, John Deere, Freightliner, and Volvo — with custom manufacturing available for units not in standard inventory.
Preventive Measures to Avoid Future Core Damage
Most premature aluminum core failures are preventable. Four practices account for the vast majority of them:
Change coolant on schedule. OEM intervals vary significantly — always verify against your specific machine's service manual:
| Coolant Product | Change Interval |
|---|---|
| Cat Extended Life Coolant | 6,000 hours |
| John Deere COOL-GARD II | 6 years or 6,000 hours |
| Komatsu Supercoolant AF-NAC | 2 years or 2,000 hours |
Always mix with distilled water. Minerals in tap water accelerate internal aluminum corrosion regardless of coolant brand.
Inspect and clean fins correctly. Clean the core face at each major service interval. Use a fin comb to straighten bent sections. For compressed air, stay at or below 30 psi (210 kPa) and work from back to front. No pressure washers — period.
Check mounting and isolators. Proper mounting hardware absorbs vibration that would otherwise fatigue the tank-to-core joints. Inspect rubber isolators and mounting pads at each service; worn isolators transmit chassis flex directly into the brazed joints.
Test for electrolysis periodically. Use a multimeter with one lead in the coolant and the other on a chassis ground. For aluminum components, the acceptable threshold is 0.15V maximum. Any reading above that warrants a grounding system inspection before the next season.
Frequently Asked Questions
Can you weld an aluminum radiator core to fix a leak?
TIG welding aluminum is technically possible, but it's not recommended for a core in service. Contaminants inside the core interfere with weld quality, and more critically, the metal surrounding the repair is already fatigued — the weld may hold while adjacent areas continue to weaken and fail within weeks.
What is the difference between re-coring and replacing an aluminum radiator?
Re-coring replaces only the internal tube-and-fin assembly while keeping the existing tanks (if structurally sound). Full replacement means installing a complete new radiator unit.
How do I know if my core needs re-coring or full replacement?
If the tanks are intact and only the core shows damage or corrosion, re-coring is viable. Cracked, separated, or debris-contaminated tanks require full replacement — re-coring over compromised tanks just adds a second failure point.
Can stop-leak products damage an aluminum radiator core?
Stop-leak is an emergency temporary measure only. In heavy equipment with complex cooling circuits — including oil coolers and charge air coolers — stop-leak particles can clog narrow passages and cause new restrictions. Never treat it as a permanent repair.
What causes aluminum cores to fail prematurely in heavy equipment?
The main accelerators are:
- Coolant left beyond its service interval (loses corrosion inhibitors)
- Incorrect coolant type for aluminum systems
- Tap water used instead of distilled water
- High-vibration environments without proper mounting isolation
How long does an aluminum radiator core typically last in heavy equipment?
Service life depends on maintenance practices, operating environment, and duty cycle. Well-maintained cores in moderate-duty applications can last through a full major service interval; high-hour agricultural or construction equipment in harsh conditions may need re-coring or replacement well before the machine does.