Introduction
A technician finishes an oil change, notices a drip near the filter housing, and swaps the filter. A week later, the same drip is back. The new filter gets blamed. Another filter goes in. The leak returns again.
This pattern is common on heavy equipment and commercial vehicles — and the filter is rarely the problem. The real source is the oil cooler sitting just inches away.
Detroit's 2019 diagnostic procedure for DD13/DD15/DD16 engines specifically flags this confusion, noting that oil spilled near the filter cap during service can be mistaken for an active engine leak. GM's Duramax service bulletin makes the same point: oil originating at the top of the engine travels downward and appears to come from somewhere else entirely.
Misread that path and you'll keep replacing filters while the actual leak gets worse. An unaddressed oil cooler failure risks lubrication loss, coolant contamination, and — on equipment operating near hot exhaust surfaces — a fire. This article explains why the mix-up happens, what actually causes oil cooler leaks, and how to diagnose them correctly the first time.
Key Takeaways
- Oil cooler leaks get blamed on the filter because oil travels downward — the cooler sits above it.
- Common failure points: degraded gaskets, loose connector bolts, cracked housings, and thermal cycling.
- Oil mixing with coolant signals an internal cooler failure — stop the engine and address it immediately.
- When visual inspection fails, dye testing with a UV lamp is your most reliable diagnostic tool.
- A cracked or compromised cooler housing can't be re-sealed reliably — replacement is the only permanent fix.
Common Causes of Oil Cooler Leakage
The oil cooler's job is straightforward: regulate engine oil temperature by passing oil through a heat-exchange element cooled by engine coolant. On turbocharged engines and heavy-duty equipment running under sustained loads, this system works hard and the components that seal it take a beating over time.
The geographic problem is just as important as the mechanical one. On many engine platforms, the oil cooler and oil filter share a mounting location, a connector bolt, or a combined module. Detroit's DD13/DD15/DD16 architecture integrates the oil cooler, oil filter, and coolant pump into a single coolant module. When the cooler seeps, oil drains downward and pools near the filter , making the filter the obvious suspect when it isn't the source.
Failed or Degraded Gaskets and O-Rings
The gasket or O-ring sealing the oil cooler to the engine block deteriorates from three converging stresses: heat cycling, oil pressure fluctuations, and chemical exposure to both oil and coolant. Over time, the elastomer loses its ability to conform to the sealing surface, and oil begins seeping from the cooler-to-block interface.
Not all failures follow the same path. Two conditions push gasket degradation significantly faster:
- High-hour equipment that has gone through hundreds of heat cycles without a gasket inspection
- Equipment where the cooler was removed for a repair and reinstalled without a fresh gasket — a shortcut that rarely holds long-term
Detroit's DD Platform installation procedure explicitly requires new O-rings any time the oil cooler is disturbed. It specifies a tightening torque of 25–30 N·m (18–22 lb-ft) for the eight cooler-to-module bolts using a defined sequence. Reusing old O-rings on reassembly is one of the more reliable ways to generate a repeat comeback.
Loose or Improperly Torqued Connector Bolts
Many engine platforms use a single connector bolt that simultaneously anchors the oil cooler to the engine block and serves as the oil filter attachment point. Each oil filter change applies torque to this bolt , and over time, that repeated cycling can work the bolt loose, breaking the cooler's seal against the block.
Improper torque creates problems at either extreme:
- Under-torqued bolt: The cooler shifts under oil pressure, opening the sealing interface
- Over-torqued bolt: Distorts stamped-metal cooler housings, which are not machined surfaces and don't recover from deformation
Neither condition can be corrected by simply re-tightening. Once the sealing surface is distorted or the gasket is compromised, the hardware alone won't hold.
Cracked or Deformed Oil Cooler Housing
Plastic filter housings and stamped-metal cooler assemblies are vulnerable to cracking when the connector bolt or filter cap is overtightened. Thermal stress sustained over thousands of operating hours compounds the risk.
Housing cracks are particularly deceptive because the oil cooler on some engine designs sits in a recessed or protected location. Oil pools internally before any external drip becomes visible. The leak appears to emerge suddenly, and near the filter, when the actual failure point is elsewhere in the assembly.
Thermal Cycling and Age-Related Seal Deterioration
Heavy equipment operating under sustained load (construction machinery, long-haul trucks, agricultural equipment) subjects oil cooler seals to repeated, extreme temperature swings that degrade rubber and elastomer compounds far faster than light-duty use.
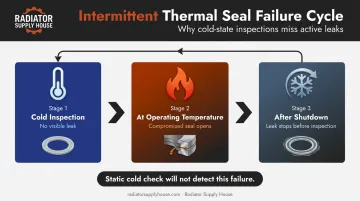
This degradation creates a diagnostic problem that catches shops off guard:
- Cold inspection: Seals appear intact; no visible leak at the cooler or filter
- At operating temperature: Components expand thermally, the compromised seal opens, and oil seeps
- After shutdown: The leak stops before the technician gets a look
That intermittent pattern is the fingerprint of thermal seal failure. A static cold check won't catch it.
What Happens If Oil Cooler Leakage Is Ignored
Catch an external oil cooler leak early and it's a straightforward repair. Miss it, and the damage escalates fast — often before the root cause is identified.
Oil loss consequences:
- Reduced lubrication to bearings, rings, and valve train components
- Accelerated wear at every point that depends on oil film thickness
- Risk of oil starvation if the leak rate increases under load
Internal failure consequences — when the cooler fails between oil and coolant passages rather than externally — are more serious. A GM service bulletin (25-NA-052) covering medium-duty trucks confirms that a leaking engine oil cooler can put oil into the coolant system, requiring cooler replacement, cooling system decontamination, and replacement of contaminated rubber components. When this happens, contaminated oil loses its lubricating properties while contaminated coolant loses heat transfer efficiency — both systems fail at once.
The fire risk is equally documented. MSHA regulations (30 CFR 75.1909) explicitly require protection against lubricating oil contacting engine exhaust surfaces — oil on a hot exhaust manifold or turbocharger housing is a recognized ignition hazard. On heavy equipment operating in mining, forestry, or confined construction environments, that's not just a maintenance issue.
Cummins notes that downtime for a mining dump truck or excavator can exceed $1,000 per hour. A leak that causes a seizure or fire takes a machine out of service for days — not an afternoon.
Warning Signs You're Dealing with a Misdiagnosed Oil Cooler Leak
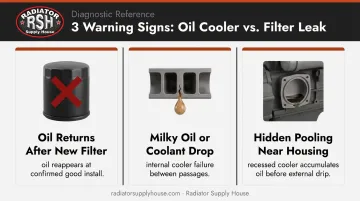
Watch for these three indicators before replacing the filter a second time:
Oil reappears near the filter shortly after a confirmed-good filter installation. If the new filter's sealing surface is dry and properly seated but a drip returns in the same location, the filter isn't the source.
Milky or discolored oil in the crankcase, or unexplained coolant level drop. Both point to internal cooler failure where oil and coolant are crossing between passages — not an external leak at all.
Oil pooling detectable only with a probe alongside the housing. On engines where the cooler sits in a recessed area, the external surface may appear clean while significant oil accumulation has already occurred nearby.
How to Diagnose and Prevent Oil Cooler Leakage
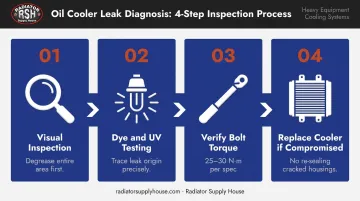
When a leak appears near the oil filter after a service, the correct response is a structured diagnostic sequence, not a second filter. Here are four steps to identify the actual source and fix it.
Step 1: Conduct a Thorough Visual Inspection Beyond the Filter
What to do: Degrease the entire area around the oil filter, cooler housing, connector bolt, and surrounding block surfaces before looking for active seepage. Use an inspection light and mirror to check the cooler-to-block sealing surface and all accessible gasket and O-ring joints.
Why it matters: Accumulated oil film obscures the actual leak origin. Degreasing resets the surface so you can distinguish oil tracking from the cooler versus genuine filter leakage.
When to do it: Before installing any replacement filter or parts — especially on engines with a shared cooler/filter bolt arrangement.
Step 2: Use Dye and UV Lamp Testing to Trace the Leak Source
Add a small quantity of fluorescent dye to the engine oil, run the engine to operating temperature, and use a UV lamp to trace exactly where the dye emerges — following the trail back from the filter to the actual point of origin.
Why it matters: A Ford OEM service method (SSM 46295) for diesel engines uses white fluorescent dye specifically to distinguish engine oil leaks from other fluid sources. Dye testing reveals paths that are invisible to the naked eye, especially when oil has traveled several inches before dripping.
When to do it: When visual inspection after degreasing is inconclusive, or when the leak has returned after a second filter installation with a confirmed properly seated filter.
Step 3: Verify Connector Bolt Torque and Inspect Sealing Surfaces
Verify the connector bolt matches manufacturer specification using a calibrated torque wrench. Inspect the cooler sealing face and engine block surface for distortion, scoring, or deformation. Replace the gasket or O-ring any time the cooler is removed — every time.
Why it matters: An under-torqued bolt allows the cooler to shift under pressure. An over-torqued bolt distorts the cooler body on stamped-metal designs. Detroit's DD Platform spec — 25–30 N·m (18–22 lb-ft) with a defined bolt sequence — exists because both errors produce the same outcome: a leak that comes back.
When to do it: At every oil service on equipment with a cooler/filter connector bolt arrangement, and any time the cooler or filter housing is disturbed during repair.
Step 4: Replace the Oil Cooler When the Housing or Core Is Compromised
If inspection reveals cracks, distorted sealing faces, or internal contamination, replace the oil cooler assembly. A damaged housing will fail again under pressure cycling — usually sooner than expected.
For heavy equipment applications, Radiator Supply House stocks ICEBOX replacement oil coolers across major platforms:
| Equipment | SKU | OEM Cross-Reference |
|---|---|---|
| Caterpillar D6H | #851238 | 7C-8242, 7C8900, 3W3925–3W3940 |
| Caterpillar D6K2 | #851171 | 376-6421, Group-417-2327 |
| Caterpillar 834B/988B/836 | #850546 | OC-1W0284, 1W0284, 6N5481 |
| Komatsu PC400-5 series | #930274 | Core: 39.5″ × 36″ × 3.5″ |
| Komatsu PC200-2 | #930247 | 205-03-62422 |
| Freightliner Cascadia | #601515 | Detroit DD15, Series 60 configs |
| John Deere 450G–650G | #870981 | AT104588 |
Each ICEBOX unit is cross-referenced against OEM part numbers and dimensioned to match original mounting configurations. For Volvo applications or platforms not listed, contact Radiator Supply House at (877) 615-3002 or radiatorsupplyhouse.com. The catalog covers 300+ manufacturers and 4,800+ SKUs.
When to replace: Whenever housing damage is confirmed, internal contamination is present, or repeated gasket replacement has failed to resolve the leak on a high-hour unit.
Tips for Long-Term Prevention
Catching oil cooler deterioration before it becomes a failure costs far less than a missed diagnosis. Adopt these practices as standard procedure:
- Inspect cooler sealing surfaces, gaskets, and O-rings at every scheduled oil service — not only when a visible leak appears. Detroit's DD operator manual directs technicians to check oil and cooling circuits during oil changes.
- Document connector bolt torque and cooler condition on each service record. On high-hour equipment, a trend of increasing seepage is a reliable predictor of imminent failure.
- Enforce manufacturer torque specifications for all filter caps and connector bolts. Train technicians that overtightening is as damaging as under-tightening on stamped-metal cooler components.
- Shorten oil cooler inspection intervals on equipment in extreme-heat environments — mining, forestry, and high-ambient construction sites accelerate seal degradation beyond what standard schedules account for.
- Use OEM part number cross-referencing when sourcing replacements. The same cooler often carries different part numbers across model years; Radiator Supply House product pages list multiple OEM equivalents with technical drawings to confirm fitment before ordering.
Conclusion
Oil cooler leaks are a well-documented, identifiable failure mode that gets blamed on the oil filter more often than it should. The misdiagnosis wastes parts and labor, leaves the actual problem unresolved, and on equipment running tight schedules, costs far more than the correct repair would have.
The diagnostic path is clear: degrease before diagnosing, verify torque before replacing, use dye testing when the source isn't obvious, and replace the cooler when the housing or core is compromised. Finding a deteriorating cooler during a scheduled inspection costs a fraction of what engine damage runs after a missed failure — and that gap widens fast on equipment that stays in the field.
Frequently Asked Questions
How do I know if my oil cooler is leaking vs. the oil filter?
Degrease the entire area, install a new filter with a confirmed proper seal, and run the engine. If oil reappears in the same location, the source is almost certainly the cooler, not the filter. Fluorescent dye and a UV lamp will pinpoint the exact source if the source remains unclear.
Is an oil cooler leak expensive to fix?
A gasket or O-ring replacement is relatively straightforward when the cooler housing is undamaged; full cooler replacement on heavy equipment involves more labor and parts cost. The bigger risk is delaying the repair — oil loss or internal contamination can cause engine damage that far exceeds the cooler repair bill.
Can you fix a leaking oil cooler?
Yes, in many cases gasket and O-ring replacement resolves the leak when the cooler housing and sealing surfaces are intact. A cracked or distorted cooler body, however, cannot be reliably re-sealed — those situations require full cooler replacement.
Can I drive with a leaking oil cooler gasket?
No. Even a minor external leak can grow under operating conditions, oil loss risks lubrication failure, and oil contacting hot exhaust surfaces creates a fire hazard. Take the equipment out of service until the cooler is inspected and repaired.
How serious is an oil cooler leak?
An external leak is serious but manageable if caught early. An internal failure, where oil enters the coolant or coolant enters the crankcase, is a critical situation. Contaminated oil loses its lubricating properties rapidly and engine wear can progress to failure quickly if the machine stays in service.
What are the signs of a failing oil cooler?
Key indicators include: oil seepage near the cooler or filter area that returns after filter replacement, milky or discolored engine oil, unexplained coolant level drops, and recurring overheating. On some engine designs, significant oil accumulation in a recessed area may only be detectable with a probe alongside the housing.