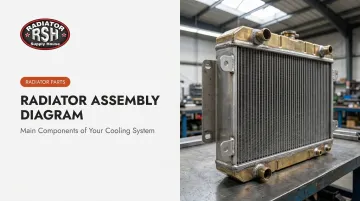
Mechanics and fleet operators who understand exactly what's inside a radiator assembly diagnose problems faster and order the correct replacement part the first time. This guide breaks the assembly down piece by piece: what each component does, how they work together, and which warning signs point to which part.
Key Takeaways
- The radiator assembly combines the core, tanks, ports, cap, and drain plug into one system.
- Water pump, fan, thermostat, and expansion tank work together to keep coolant moving and pressurized.
- A single failed part, such as a stuck thermostat, can disrupt the entire cooling loop.
- Overheating, leaks, and discolored coolant are the earliest warning signs.
- Knowing each part's role speeds up diagnosis and helps you source the right replacement.
What Is a Radiator Assembly?
A radiator assembly is a complete cooling unit, not just the radiator itself. It includes every component that circulates, regulates, and dissipates heat away from the engine.
Pop the hood on a wheel loader or a Class 8 truck and you'll find a network of tanks, tubes, hoses, and valves. Each part works toward one goal: keeping the engine inside its operating temperature range.
Heavy equipment runs harder than most machinery, and that changes what the cooling system has to handle. Construction, agricultural, mining, and commercial trucking applications routinely operate under sustained heavy loads for hours at a stretch, which puts a bigger thermal burden on the cooling system with far less margin for error.
Cummins' liquid-cooled generator set application manual builds in a 115% cooling capability allowance to account for radiator fouling, altitude, and ambient temperature swings over a machine's service life. That buffer reflects how demanding these operating conditions really are.
That's why it helps to think of the cooling system as a diagram, a set of labeled, sequential parts. When a machine starts running hot, you don't need to guess. You need to know whether the problem sits in:
- The core
- The pump
- The thermostat
- Somewhere else entirely
Reading the parts correctly gets you there faster.
Main Components of the Radiator Assembly
These are the parts found directly within or bolted to the radiator itself: the components you'd see if you pulled the unit off the machine and set it on a bench.
Radiator Core
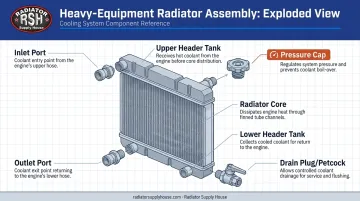
The core is the busiest section of the entire assembly: a dense network of narrow tubes, typically aluminum or copper-brass, packed between rows of thin fins. Hot coolant flows through the tubes while air moves across the fins, pulling heat away as it passes.
Row count matters here. A 2-row core moves less coolant volume than a 3-row or higher-row design, which is why heavy equipment often calls for deeper, multi-row cores than standard machinery needs.
Radiator Supply House's catalog reflects that range: everything from standard cores up to a 7-row Z-core steel design built for Caterpillar dozers, along with B-Core and M-Core configurations engineered for large excavators and haul trucks. Both copper-brass and all-aluminum construction are available, with copper-brass more common on trucks and RVs and aluminum more typical on Caterpillar-style construction equipment.
Upper and Lower Header Tanks
The upper tank is the entry point for hot coolant coming from the engine. The lower tank is the exit point, where cooled coolant heads back toward the water pump. Together, they house and direct flow through the core.
Heavy-duty radiators generally use aluminum tanks (some older units still use brass) built to hold up under high pressure, while lighter-duty units often use plastic tanks crimped to an aluminum core. Tanks are also stocked as standalone replacement parts, useful when only the tank has failed and the core is still good.
Inlet and Outlet Ports (Hose Connections)
The inlet port, usually on top, connects to the engine via the upper radiator hose and carries hot coolant into the radiator. The outlet port, at the bottom, connects to the water pump via the lower hose and sends cooled coolant back to the engine.
Port size, placement, and connection type vary significantly between makes and models:
- Some Freightliner radiators use a Top Right/Bottom Left (TRBL) hose layout, while others on the same platform use Top Left/Bottom Right (TLBR). The direction is not interchangeable.
- Kenworth C500 radiators pair a 2½-inch upper connection with a 3-inch lower connection, a deliberate size difference.
- John Deere dozer radiators sometimes use two different port diameters on the same unit.
Getting this wrong means a radiator that physically won't connect to your existing hoses. Radiator Supply House catalogs over 3,885 radiator cores and cooling products across hundreds of equipment makes specifically to match these configuration details.
Radiator Cap (Pressure Cap)
The radiator cap is a spring-loaded pressure relief valve, not simply a seal. Maintaining pressure inside the system raises the coolant's boiling point, which lets the engine run hotter without the coolant flashing to vapor.
Pressure ratings are application-specific, not universal. Cat's Extended Life Coolant documentation shows a 15 psi cap with a 50% ELC mixture raising boiling protection to 265°F (129°C), while other heavy-duty and industrial systems run anywhere from 10 to 16 psi depending on the engine and coolant chemistry.
When pressure exceeds the cap's rating, the valve opens and releases coolant into the overflow tank instead of letting the system rupture. A worn or mismatched cap is a common but often-overlooked cause of overheating.
Drain Plug (Petcock)
The drain plug is a valve at the base of the lower tank that lets technicians drain coolant without disconnecting hoses. It's a small part, but it matters during coolant flushes and routine servicing. Skip proper drain intervals on heavy equipment, and sludge and contamination build up inside the core, slowly reducing heat transfer efficiency.
Supporting Components That Complete the Cooling System
These parts surround the radiator and keep the entire circuit functioning. Each is distinct from the radiator itself, but the system doesn't work without any one of them.
Water Pump
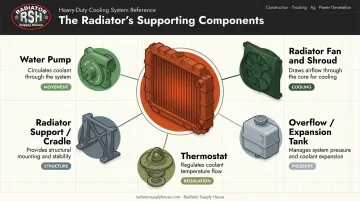
The water pump, typically a centrifugal design driven by the engine belt or gear, is the force that keeps coolant moving through the entire circuit. Without it, coolant sits still and heat builds rapidly in the engine block.
Common failure symptoms include:
- Coolant leaking from the pump seal
- Whining or grinding noise from the bearing
- Overheating under load, even with everything else functioning
Any of these stop coolant flow to the radiator, regardless of how well the rest of the assembly is working.
Radiator Fan and Fan Shroud
The fan draws air through the core to assist heat dissipation, especially when the vehicle or machine is stationary or moving slowly. It can be mechanically driven off the crankshaft through a fan clutch, or run as an independent electric unit.
The fan shroud, a plastic or metal housing around the fan, channels that airflow directly through the core instead of letting it bypass around the edges. A missing or damaged shroud noticeably reduces cooling efficiency, even when the fan itself works perfectly.
Thermostat
The thermostat is a temperature-sensitive valve. It stays closed while the engine is cold, letting it warm up quickly, then opens once coolant reaches the operating temperature threshold, sending hot coolant into the radiator.
A thermostat stuck closed causes rapid overheating. One stuck open lets the engine run too cool and inefficiently. Both conditions create real problems in heavy-duty equipment that depends on precise, consistent temperature regulation.
Radiator Support (Radiator Cradle / Mounting Frame)
The part that holds the radiator in place is called the radiator support, also known as the radiator cradle or mounting frame: a structural bracket bolted to the vehicle or equipment chassis that positions the radiator for correct airflow.
On heavy equipment, this bracket absorbs constant vibration and mechanical stress. A bent, cracked, or corroded support misaligns the radiator, restricts airflow, and stresses hose connections until they start leaking. Mounting hardware for this bracket is typically bundled inside complete cooling packages rather than sold as a standalone item, since it's specific to each chassis design.
Overflow / Expansion Tank
The overflow, or expansion tank, catches coolant released by the pressure cap during high-heat operation and returns it once the engine cools, preventing coolant loss and keeping air out of the system.
Checking this tank's level and color is one of the easiest first-step diagnostics available. A low level may point to a leak somewhere in the circuit. Discolored coolant (rusty or oily) signals internal contamination that needs attention right away.
How the Components Work Together
Picture the coolant circuit as a continuous loop, not a series of isolated parts:
- Coolant starts at the water pump, which pushes it through the engine block, where it absorbs heat from combustion.
- Heated coolant travels through the upper hose into the radiator's inlet port and upper tank.
- It flows down through the core tubes, shedding heat to airflow pulled through by the fan.
- Cooled coolant exits through the lower tank and outlet port, heading back to the water pump to repeat the cycle.
Two more components keep this loop under control:
- Thermostat: Acts as the circuit's gatekeeper, deciding when hot coolant enters the radiator at all.
- Pressure cap and expansion tank: Manage system pressure and coolant volume as temperatures rise and fall throughout a shift.
In heavy equipment and commercial vehicles, this cycle runs continuously under real thermal stress for hours at a time. Every part in the loop has to perform correctly — a stuck thermostat, a worn water pump, or a clogged core doesn't just cause a local problem. It disrupts the entire circuit.
Common Signs a Cooling System Component Is Failing
Catching these symptoms early prevents a simple fix from becoming a full replacement:
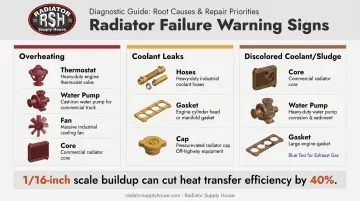
- Overheating or a rising temperature gauge: Traces to a clogged or cracked core, a failed water pump, a stuck thermostat, or a broken fan. Systematic inspection, not automatic full-system replacement, pinpoints the cause.
- Coolant leaks: Puddles under the machine, a low reservoir, or white smoke from the exhaust point to cracked inlet or outlet ports, a failed pressure cap, deteriorated hose connections, or a compromised core. Ignoring a leak lets air pockets form, accelerating overheating.
- Discolored coolant or sludge buildup: Signals corrosion inside the tanks and core, or oil contamination from a failing head gasket. Fleet Maintenance reports that as little as 1/16 inch of scale buildup can cut heat transfer efficiency by 40%, and cooling problems cause up to 40% of unplanned engine downtime. Rust-colored or oily coolant means a flush or inspection is overdue.
Frequently Asked Questions
What are all the parts of a radiator?
Core components include the radiator core (tubes and fins), upper and lower header tanks, inlet and outlet ports, the pressure cap, and the drain plug. Some units also include transmission cooler lines or a filler neck.
What is the part called that holds the radiator?
It's called the radiator support, also known as the radiator cradle or mounting frame. This structural bracket bolts to the chassis, positioning and securing the radiator for proper airflow and cooling.
How do I know if my radiator core is failing?
Watch for visible external corrosion, coolant leaking from the fins or tank seams, reduced coolant flow, overheating under load, or discolored, rusty coolant. Any of these warrants an inspection right away.
What does a radiator cap do and why does pressure matter?
The cap is a pressure-relief valve that keeps the system pressurized, which raises the coolant's boiling point. A worn or incorrectly rated cap lowers system pressure, drops the boiling point, and raises the risk of overheating and coolant loss.
Can I replace just one component, or do I need the whole radiator?
Individual parts like hoses, the thermostat, the cap, or the fan can usually be replaced on their own. If the core or tanks are cracked or corroded, the radiator itself typically needs replacing since patching a damaged core rarely holds up long-term.
How often should cooling system components be inspected on heavy equipment?
Follow your manufacturer's service intervals, typically every 250 to 500 hours, for coolant checks. Inspect hoses, the fan, thermostat, and water pump at each major service interval or whenever overheating symptoms appear.