Introduction
The Freightliner XC chassis — used across Class A motorhomes from Winnebago, Newmar, Fleetwood, and Tiffin — is not a standard commercial truck platform. Its rear- or side-mounted radiator, tight chassis clearances, and interconnected hoses, charge air coolers, and oil coolers create access challenges that catch unprepared shops off guard.
Get the sequence wrong, and you're looking at coolant contamination, bent cooling fins, or cracked fittings before the radiator is even free.
This guide is written for experienced diesel mechanics and trained fleet technicians familiar with heavy-duty cooling systems. If your shop hasn't worked on an XC chassis before, bring in someone who has — the consequences of rushing include coolant contamination, bent cooling fins, cracked fittings, and damage to surrounding components.
The FCCC 2022 Recreational Vehicle Chassis Maintenance Manual is explicit: the XC is custom-built, and not all general guidance applies to every variant. Match your procedures to your specific chassis year and engine.
Key Takeaways
- Let the engine cool completely before touching any cooling system component
- Verify replacement radiator compatibility with your specific XC year and engine before disassembly
- Work in order: safety prep, draining, hose and line disconnection, shroud removal, then radiator extraction
- Use a drain pan that holds at least 12.5 gallons to cover the largest documented XC coolant capacity
- Inspect all hose ends, clamps, and mounting hardware before fitting the replacement unit
Freightliner XC Chassis Radiator Removal: Step-by-Step
Radiator removal on the XC follows a defined sequence. Skipping steps (particularly draining before disconnecting hoses, or attempting shroud removal before loosening radiator mounts) is the most common cause of avoidable damage on this chassis.
Budget 2–4 hours for the full job. More if fasteners are corroded. A second technician is strongly recommended for the extraction step.
Prerequisites and Safety
Engine cool-down: The FCCC maintenance manual requires the engine and cooling system to be completely cooled before removing or loosening the radiator cap. A historical FCCC threshold from their 2007 training document put this at below 120°F water temperature, but current guidance uses the stricter qualitative condition "completely cooled." If you're uncertain, wait longer.
Additional safety steps before starting:
- Disconnect the negative battery terminal before any front-end work — the XC's integrated vehicle systems create real electrical risk
- Verify radiator compatibility before disassembly. XC chassis variants span multiple engine options (Cummins B6.7, L9, ISB/ISC/ISL/ISM, Caterpillar C7, and MBE 926). Pulling the wrong replacement part mid-job costs time you don't have
- Identify all radiator connections upfront: upper and lower coolant hoses, overflow tank hose, and transmission cooler lines. The 2006 FCCC spec sheet documents a remote-mounted water-to-oil transmission cooler on XC configurations, though routing varies by build
Tools and Parts Required
Essential tools:
- Socket and wrench set (metric and SAE — confirm sizes against your specific chassis fasteners)
- Hose clamp pliers
- Flathead and Phillips screwdrivers
- Large-capacity drain pan — minimum 13 gallons, based on the highest documented XC coolant capacity of 12.5 gallons for ISM-equipped, side-radiator configurations
- Radiator lift assist or a second technician
Optional but useful:
- Penetrating oil for corroded fasteners
- Labeling tape and a marker for hose identification
- Cable ties for hose management during extraction
No specialized tooling is required. Size your drain pan against the capacity table below before starting — an undersized pan is the most avoidable mistake on this job.
Step-by-Step Removal Process
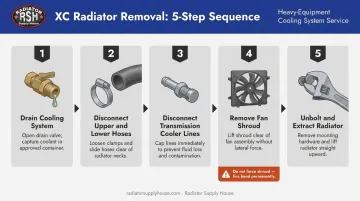
Step 1 — Drain the cooling system
Position your drain pan under the petcock valve at the radiator base. Open the valve, then remove the radiator cap to break the vacuum and speed drainage. Coolant must be collected and disposed of per your local environmental regulations — it cannot simply be discharged.
Documented coolant capacities for XC configurations (from FCCC's 2007 chassis training document):
| Engine / Radiator Config | Capacity |
|---|---|
| Cummins ISB, rear radiator | 36 qt / 9 gal |
| Caterpillar 3126/C7, rear or side | 38 qt / 9.5 gal |
| Cummins ISC or ISL, side radiator | 42 qt / 10.5 gal |
| Cummins ISM, side radiator | 50 qt / 12.5 gal |
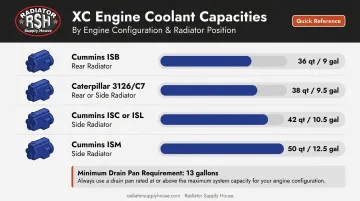
Current FCCC documentation notes that capacity varies with engine and accessory installation — confirm your specific configuration.
Step 2 — Disconnect upper and lower radiator hoses
Use hose clamp pliers to release the clamps. Twist and pull each hose free — expect residual coolant. Cap or lay hose ends clear of the work area.
Step 3 — Disconnect transmission cooler lines and auxiliary connections
Disconnect transmission cooler lines one at a time, capping each immediately to prevent fluid loss. Photograph or label their routing before removal — reconnecting these to the wrong fittings is a documented reassembly error on the XC. Disconnect the overflow tank hose at this stage as well.
Step 4 — Remove the fan shroud
On most XC configurations, the shroud must come out before the radiator can be extracted. Unbolt it from its mounting points and work it free from around the fan blade.
If clearance is tight, partially loosen the radiator mounting bolts first. That forward movement is usually enough to slide the shroud free. Do not force it — contact with the cooling fins causes damage that is difficult to reverse.
Step 5 — Unbolt and extract the radiator
Remove all mounting bolts securing the radiator to the chassis frame brackets. Set aside the lower isolator mounts and rubber grommets for inspection — replace any that show compression set or cracking.
With all fasteners removed, have a second technician support the radiator from the opposite side. Guide it straight out, keeping it clear of surrounding components and frame edges.
Post-Removal Inspection
Don't rush straight to fitting the replacement. With the radiator out, inspect:
- Mounting brackets and frame area — look for corrosion, cracks, or deformation; address these before the new unit goes in
- Hose ends and clamps — cracking, stiffness, or deterioration means replacement now, not after the next failure
- Transmission cooler line fittings — check for wear and sealing integrity at the connection points
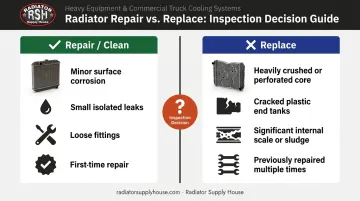
What you find during this inspection drives the repair-or-replace decision. The FCCC maintenance manual permits cleaning and repair when damage is minor and isolated — surface corrosion, small leaks, or loose fittings. Signs the radiator needs replacement instead:
- Heavily crushed or perforated core sections
- Cracked plastic end tanks
- Significant internal scale or sludge buildup
- A radiator that has already been repaired more than once
Common Radiator Removal Problems and How to Fix Them
Seized or Corroded Mounting Bolts
Mounting bolts corroded into the frame brackets are the most time-consuming obstacle in this job. Road salt exposure, long service intervals, and galvanic corrosion between dissimilar metals at the mounting points all accelerate the problem.
When a bolt won't turn:
- Soak with penetrating oil and wait at least 15–20 minutes before retrying
- Use a breaker bar for additional torque — not an impact gun, which can snap fasteners flush
- Extract any broken fasteners completely before fitting the replacement radiator
Residual Coolant Contamination
Coolant spilling into the engine bay during hose or cooler line disconnection usually traces back to one of three causes: drain pan not fully positioned, system not fully depressurized, or hoses pulled before drainage was complete.
Flush any affected area with clean water right away — coolant is corrosive to paint and certain metals if left to sit. Before disconnecting lower hoses, confirm the radiator cap is off. Skipping this step is the most common reason drainage stalls mid-job.
Fan Shroud Clearance Issues
Tight front-end clearances on the XC chassis create a sequencing conflict: the shroud won't clear without the radiator already partially moved.
The fix is straightforward — loosen (don't remove) the radiator mounting bolts to allow slight forward movement, then slide the shroud upward and free. Never force it against resistance. Cooling fins bend easily and can't be straightened to spec once deformed.
Pro Tips for a Smooth Removal
- Photograph everything before you touch it. Two minutes with a phone camera — hose routing, cooler line paths, any nearby electrical connections — eliminates reassembly guesswork.
- Label each hose and line as it comes off. The transmission cooler lines in particular must return to the correct fittings. Reversed connections cause transmission damage.
- If the vehicle has high mileage, budget for hoses, clamps, and isolator mounts alongside the replacement radiator. Order them before you start — waiting on parts with a disassembled chassis kills downtime.
For the replacement radiator itself, verify compatibility by year, engine type, and OEM part number before ordering. Radiator Supply House stocks OEM-equivalent radiators for Freightliner motorhome chassis applications — their team can confirm fitment for your specific XC configuration . Reach them at +1 877-615-3002, Monday–Friday, 7AM–5PM.
Conclusion
Freightliner XC radiator removal is manageable for a competent diesel mechanic — but the chassis-specific configuration, custom builds, multiple engine options, and tight clearances mean sequence matters and compatibility must be confirmed before you start.
Complete the post-removal inspection before fitting anything new, and match your replacement to your specific year and engine configuration. Radiator Supply House stocks OEM-equivalent radiators for Freightliner motorhome chassis across a wide range of configurations. Call +1 877-615-3002 (Monday–Friday, 7AM–5PM) to confirm the right fit for your unit.
Frequently Asked Questions
How long does it take to remove a radiator from a Freightliner XC chassis?
Most experienced diesel mechanics complete the job in 2–4 hours. Add time if mounting fasteners are seized or if the fan shroud requires extra maneuvering — both are common on older or high-mileage XC chassis.
Do I need to remove the fan shroud before pulling the radiator on a Freightliner XC?
Yes: in most XC configurations, the shroud must be removed or at minimum loosened before the radiator can clear the chassis. Tight front-end clearances typically require loosening the radiator mounts first to create working room for the shroud.
Can I reuse the coolant drained during radiator removal?
Coolant can be reused if it's uncontaminated, within its service life, and stored in a clean sealed container. If the radiator failed due to internal corrosion or contamination, use fresh coolant and don't reintroduce compromised fluid into the system.
What signs indicate my Freightliner XC radiator needs replacement rather than repair?
Replace rather than repair when you're dealing with heavily crushed or perforated core sections, cracked plastic end tanks, significant internal scale buildup, or a unit that's already been repaired multiple times. The FCCC manual allows cleaning and minor repairs, but extensive core damage warrants a new radiator.
Is radiator removal on the Freightliner XC a one-person job?
Most steps can be done solo, but the final extraction is much easier with a second technician. The core is heavy and awkward to guide clear of surrounding components, and fins bend easily if the unit shifts during removal.
How much coolant does the Freightliner XC cooling system hold?
Capacity varies by engine configuration: FCCC's 2007 chassis data lists 9 gallons for the Cummins ISB with rear radiator and 12.5 gallons for the Cummins ISM with side radiator. Use a drain pan rated for at least 13 gallons and have a full charge of fresh coolant ready before you start.