Introduction
The lower radiator hose does one job: return cooled coolant from the radiator's bottom outlet back to the water pump inlet. Simple in function, but not in failure.
Unlike the upper hose, the lower hose operates under suction from the water pump rather than pressure alone. That combination of thermal cycling, vacuum stress, and constant coolant contact makes it one of the more failure-prone components in the cooling system.
For heavy equipment, commercial trucks, and construction machinery, a leaking lower hose can take an engine down fast — well before a temperature gauge catches up.
This guide covers what causes lower radiator hose leaks, how to spot the warning signs, what happens when you ignore them, and how to fix and prevent them.
Key Takeaways
- The lower radiator hose carries cooled coolant back to the water pump — and is prone to both leaks and collapse under suction.
- Rubber aging and clamp failure are the leading causes; contaminated coolant accelerates deterioration.
- Watch for coolant puddles, a dropping reservoir level, a rising temperature gauge, or a soft/cracked hose.
- A neglected leak can warp cylinder heads or blow a head gasket — repairs that cost far more than a hose.
- Inspect hoses at every scheduled service interval (or every 500 hours on heavy equipment) and replace at the first sign of softness or cracking.
What Causes a Lower Radiator Hose to Leak
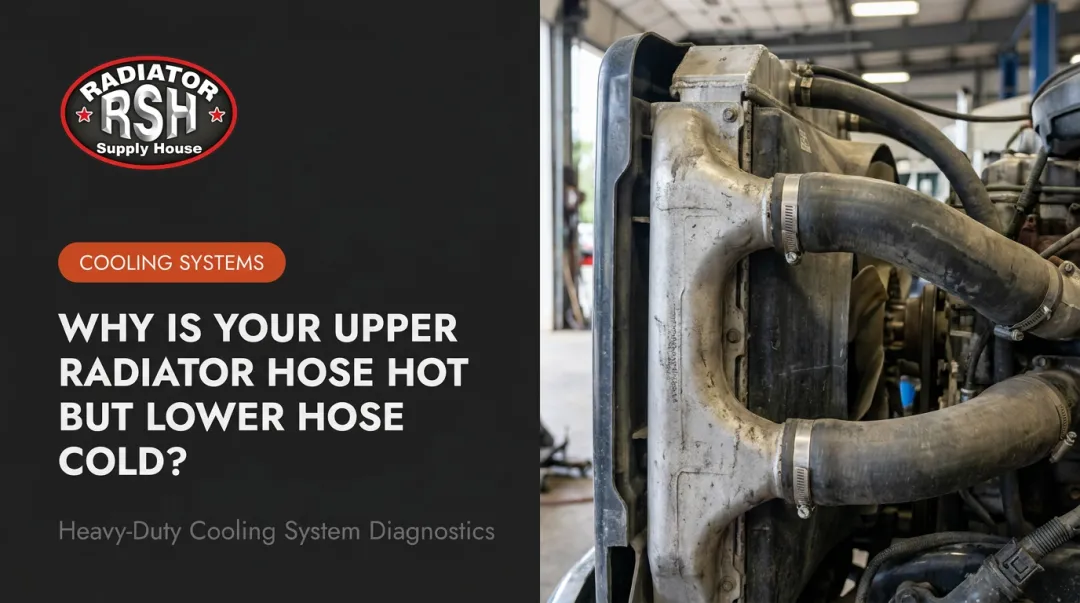
The lower radiator hose connects the radiator's bottom tank to the water pump inlet. As Caterpillar's parts documentation confirms, this hose is reinforced specifically to resist suction collapse — a failure mode the upper hose doesn't face. When it leaks, one of four root causes is almost always responsible.
Hose Aging and Physical Deterioration
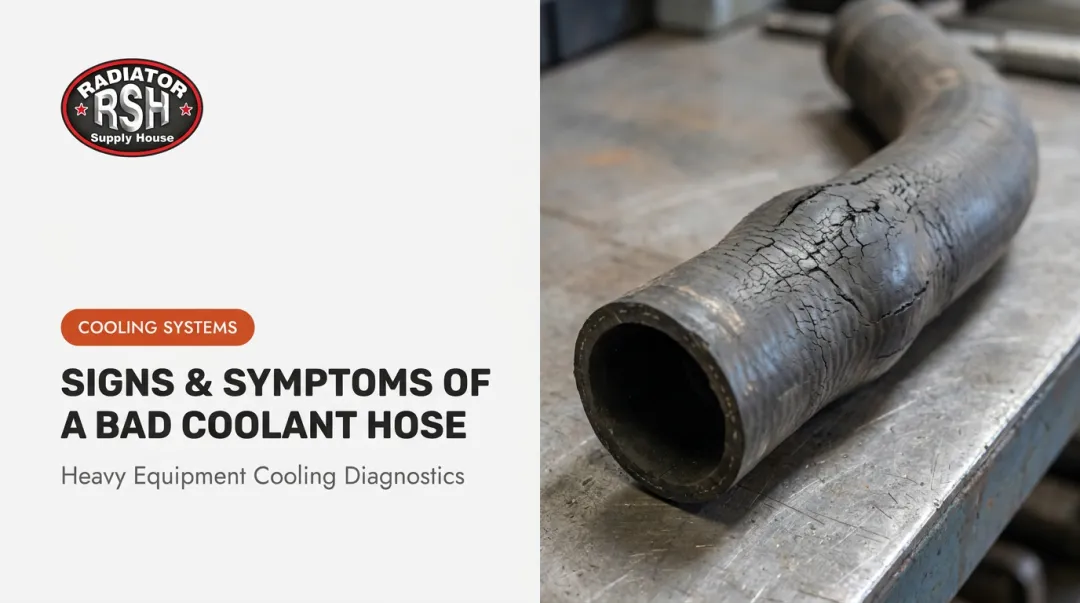
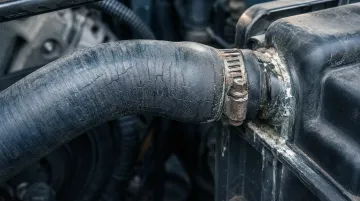
Every heat cycle — engine warm-up, cool-down, repeat — stresses the hose material until the rubber hardens, loses elasticity, and develops surface cracks. High-mileage trucks and high-hour construction equipment are particularly susceptible because the cumulative thermal stress is enormous.
Physical warning signs of an aging hose:
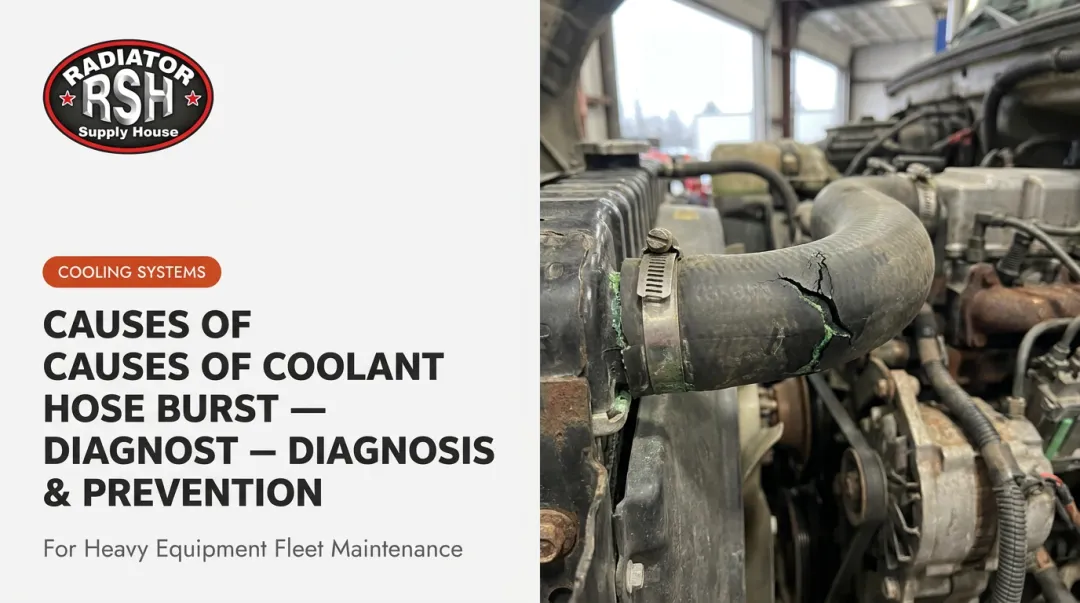
- Surface cracking or visible crazing of the outer rubber
- A stiff, brittle texture that doesn't flex naturally
- Spongy or mushy sections, especially near the clamp ends
- Bulging at connection points
The Detroit Diesel Series 50 service guide sets a clear benchmark: inspect hoses daily and replace them at major overhaul or after a maximum of five years, whichever comes first. Long-life coolant intervals don't extend hose life — the rubber ages regardless of coolant chemistry.
Clamp Failure and Improper Positioning
Dayco's technical guidance identifies "crevice attack" as a leading cause of leaks at hose connection points. The mechanism: when a clamp sits away from the fitting bead rather than directly over it, a small void forms between the hose and the neck. Coolant additives and rust accumulate in that void, progressively eroding the seal.
Rusted or deformed clamps cause the same problem — they can't maintain consistent clamping force. Always replace clamps when replacing the hose, and seat them as close to the fitting bead as the connection geometry allows.
Coolant Degradation and Contamination
Old coolant loses its corrosion inhibitors. Once that protection breaks down, rust and additive deposits form inside the hose, deteriorating the rubber from the inside out. This internal degradation is invisible from the outside — a hose can look fine while failing internally.
Mixing incompatible coolant types accelerates this breakdown significantly. Caterpillar explicitly warns that mixing its fluids with non-compatible brands can cause chemical incompatibility and component damage. Always identify coolant by specification from maintenance records — not by puddle color, since color varies by manufacturer and chemistry type.
Abrasion and External Damage
The lower hose is routed low in the engine bay, often near moving components, engine mounts, and chassis members. Constant contact with any of these causes gradual wear-through. In heavy equipment with complex underhood routing — excavators, wheel loaders, agricultural tractors — abrasion points are harder to spot during routine checks.
Oil or grease contamination from nearby leaks compounds the damage. Dayco notes that oil contact causes hose swelling, which accelerates failure. Replacing a swollen hose without fixing the source oil leak guarantees a repeat failure.
Symptoms of a Lower Radiator Hose Leak
The lower hose sits deep in the engine bay, close to the ground. Leaks here can go undetected longer than upper hose failures — so knowing what to look for early matters.
Coolant Puddles Under the Vehicle
The lower hose drains toward the ground when leaking. Look for puddles near the front of the machine with a greenish, orange, or pinkish tint and a faintly sweet smell. Don't confuse this with clear, odorless condensate from an air conditioning system — coolant has a distinct sweet-sharp odor.
As Fleet Equipment notes, coolant color varies by chemistry type, so color alone can't confirm which coolant formulation is leaking — but it does confirm a problem worth investigating.
Dropping Coolant Reservoir Level
A slow seep from the lower hose connection may not produce visible puddles initially. Instead, the coolant level in the reservoir steadily drops. If you find yourself topping off the reservoir repeatedly without an obvious external leak, the lower hose connection deserves close inspection.
Rising Temperature Gauge or Automatic Shutdowns
Reduced coolant flow means reduced heat transfer from the engine. In commercial trucks, the temperature gauge climbs noticeably before other symptoms appear. In heavy equipment, many systems trigger automatic engine shutdowns at elevated temperatures — protecting the engine but stopping work.
Visible Hose Damage
A healthy lower radiator hose has firmness with flexibility — it compresses slightly under hand pressure and springs back. A failing hose shows clear physical signs:
- Feels mushy or yields easily under light pressure
- Cracks audibly when squeezed
- Shows surface cracks, discoloration, or swelling
- Bulges near either clamp end
Detroit Diesel's operator manual calls for daily inspection of hoses for punctures and abnormally soft or hard areas. By the time a visible leak appears, hose degradation is already well underway.
Sweet or Burning Smell and Steam
When coolant drips onto hot exhaust components or the engine block, it produces a sweet, slightly sharp smell and generates steam. This warning sign often appears before the temperature gauge responds — especially on slow seeps where coolant volume loss is gradual.
What Happens If You Ignore a Leaking Lower Radiator Hose
Coolant loss doesn't plateau — it accelerates. What starts as a seep becomes a steady drip, and sustained low coolant volume leads directly to overheating. Caterpillar's heavy-duty truck engine guidance confirms that low coolant can cause an engine to run hot and damage the oil cooler, adding significant repair cost on top of the original problem.
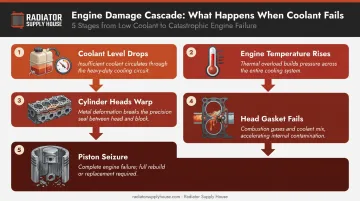
The damage cascade looks like this:
- Coolant level drops — reduced heat exchange capacity
- Engine temperature rises — beyond safe operating range
- Cylinder heads warp — metal deforms under sustained heat
- Head gasket fails — combustion gases enter the coolant system
- Piston seizure — the worst case, requiring a full engine overhaul
A planned lower hose replacement involves parts, coolant recovery, refill, and labor. An ignored leak that escalates to head gasket failure adds roadside service calls, engine teardown, and machining or replacement of warped heads.
Cat notes that exact overhaul costs depend on equipment condition and required parts. Dealer quotes consistently put heavy-duty head and gasket repairs at many times the cost of preventive hose work.
For fleet operators, the financial impact extends beyond repair cost. A 2018 Transport Topics analysis estimated $800–$1,000 in lost fleet revenue per truck per day — a figure that hasn't improved. For construction equipment on active project sites, unplanned downtime can disrupt project schedules, trigger penalty clauses, and require expensive rental replacements.
Beyond the cost, there's a safety risk. A sudden coolant loss at highway speed or during heavy work cycles gives no warning. Steam release, abrupt power loss, and potential engine seizure create serious injury risks for operators and anyone in the work zone.
How to Fix a Lower Radiator Hose Leak
Step 1: Safe Inspection First
Never open the cooling system on a hot engine. Detroit Diesel's service documentation explicitly prohibits removing a pressure cap at operating temperature — the pressurized coolant releases violently. Let the engine cool completely, then:
- Visually trace the lower hose from the radiator base to the water pump inlet
- Check both clamp ends for wetness, dried coolant residue, or white mineral deposits
- Squeeze the hose body — feel for soft spots, bulges, or stiffness
- Look for abrasion wear, surface cracks, and swelling
Step 2: Temporary Measures (and Their Limits)
Hose repair tape and stop-leak additives can get equipment back to a maintenance bay in an emergency. That's their only appropriate use.
Detroit Diesel's Series 50 documentation prohibits sealer additives in the cooling system entirely. Stop-leak products risk clogging small passages in radiators and water pumps if used repeatedly or in excess — they are not a substitute for proper repair.
Step 3: Proper Hose Replacement
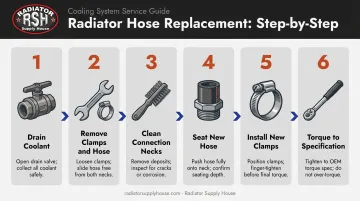
Follow this sequence:
- Drain the coolant into a clean container — open the radiator petcock and disconnect the lower hose at its lowest point following your equipment's service manual drainage procedure
- Loosen and remove both clamps, then pull the old hose free
- Clean the connection necks — remove residue, inspect for corrosion or pitting
- Seat the new hose fully over both connection necks
- Install new clamps close to the fitting bead — not on the hose body, positioned directly over the bead to ensure a secure seal
- Torque to specification — clamp torque is product- and application-specific. Flexfab specifies 40 in-lb initial torque for its constant-tension clamps, while a John Deere tractor manual calls for 8 N·m (71 lb-in) for its identified hose clamps. Always use the value from your equipment's service manual, not a generic figure
Replace the hose and the clamps together. Reusing worn clamps with a new hose is a false economy.
Step 4: Coolant Refill and System Bleed
Refill with the OEM-specified coolant type and concentration — never mix formulations. Run the engine with the heater on to purge air pockets. Detroit Diesel's procedure raises engine speed above 1,000 rpm while topping up the reservoir until the level stabilizes. Check for leaks at both connection points once operating temperature is reached, then recheck the coolant level after the first full heat cycle.
Sourcing the Right Replacement Hose
Once you've completed the repair steps, the quality of the replacement hose determines how long that repair holds. Hose diameter, length, angle, and end configuration must match the specific make, model, and engine — a close fit isn't good enough.
Radiator Supply House stocks OEM-equivalent cooling system components for Caterpillar, Freightliner, Kenworth, Peterbilt, and John Deere equipment, with configuration-specific fitment guidance covering lower hose connection details like bolt count, angle, and diameter. For fleets spanning multiple brands — Cat, Komatsu, Freightliner, and others — sourcing from a specialized supplier ensures proper fitment rather than a generic substitute.
How to Prevent Lower Radiator Hose Leaks
Regular Visual and Physical Inspections
CCJ Digital, citing Gates and Continental ContiTech specialists, recommends inspecting hoses at every service interval — ideally at each oil change. For the lower hose specifically, that means a deliberate effort: it's harder to see than the upper hose and often overlooked during quick walkaround checks.
What to check at each interval:
- Visual: cracks, swelling, discoloration, abrasion wear
- Physical: squeeze test for firmness — mushy or brittle both indicate problems
- Connection ends: look for seepage, dried residue, or clamp rust
Timely Coolant Flush and Correct Coolant Type
Degraded coolant accelerates hose deterioration — but coolant life and hose life run on separate clocks. Even with long-interval coolants, hoses need independent attention:
- Cat Extended Life Coolant: 20,000-hour or 6-year interval
- John Deere Cool-Gard: 6,000 hours or 6 years under correct conditions
- Hose replacement: Detroit Diesel benchmarks a 5-year maximum, regardless of coolant condition
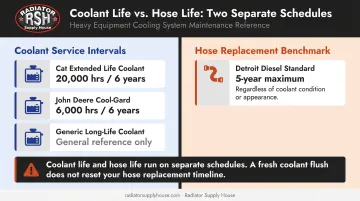
Use OEM-specified coolant and never mix chemistry types. If maintenance records are unclear about what's in the system, a coolant flush and refill with the correct formulation is the safest approach.
Proper Clamp Installation and Routing Checks
Every time a hose is serviced, verify:
- Clamp position — seated over the fitting bead, not on the hose body
- Clamp condition — replace corroded or distorted hardware
- Hose routing — clear of moving parts, sharp edges, and heat sources
- Abrasion sleeves or retainers — replace any that are missing or damaged
Dayco's guidance recommends restoring protective sleeves and retainers before installing a replacement hose. Skipping this step means the new hose faces the same abrasion that destroyed the old one.
Frequently Asked Questions
How much does it cost to fix a radiator hose leak?
Replacement costs vary by equipment type, access complexity, coolant volume, and local labor rates. What's consistent: planned hose replacement costs a fraction of what overheating-related engine repairs do. Get a quote from your dealer or repair shop using your equipment's serial number for an accurate figure.
How do you tell if a lower radiator hose is bad?
Squeeze it. A bad hose feels mushy, collapses too easily, or conversely feels rock-hard. Surface cracking, swelling near the clamp ends, coolant seepage at connection points, and a history of dropping coolant levels or unexplained overheating are all reliable indicators.
Can I drive with a leaking radiator hose?
Not recommended. A slow seep can escalate to rapid coolant loss with little warning, and driving to that point risks serious engine damage. For heavy equipment, stop operation immediately and inspect before resuming work — the downtime from a hose replacement is far shorter than the downtime from an overheated engine.
Does a coolant leak always mean a blown head gasket?
No. Most coolant leaks come from hoses, clamps, the radiator, or the water pump. A blown head gasket is a distinct failure with its own symptoms: white exhaust smoke, oil contaminated with coolant (milky appearance), or coolant loss with no visible external leak.
How long does a lower radiator hose last?
Detroit Diesel's Series 50 documentation sets a clear benchmark: maximum five years or major overhaul interval. Equipment operating in high-heat, high-vibration environments — mining, demolition, agricultural field work — may see faster deterioration. Condition-based inspection at every service interval is more reliable than a fixed replacement schedule.
What's the difference between the upper and lower radiator hose?
The upper hose carries hot coolant from the engine to the radiator; the lower hose returns cooled coolant from the radiator back to the water pump inlet. The lower hose operates under suction from the water pump rather than system pressure, making it prone to collapse as well as leaks (and typically harder to inspect given its position low in the engine bay).